Jump to a question in this guide
- Why is the window wet, and what needs attention first?
- Which surface is wet: inside, outside or between?
- How does invisible moisture become a droplet?
- Why do drops often start along the lower edge?
- Can moisture on the outdoor face be a different story?
- What do curtains, deep sills and nearby heating change?
- Where is the room moisture coming from, and where can it leave?
- Would a lower humidity reading or tighter window settle the problem?
- What can the dew-point calculator actually explain?
- Why can a careful-looking measurement still mislead?
- Which visible changes deserve more than another wipe?
- What can I do while the cause is being investigated?
- Which part would the proposed repair actually change?
- What should I ask before accepting replacement or investigation?
- What is worth recording without creating a complicated file?
- How will I know whether the next step answered the question?
Five things to know
- Locate the wet face and distinguish a sealed glazing unit from a separate storm window.
- Room moisture and the temperature of the actual surface work together.
- Coverings, room-air movement and ventilation can change conditions without identifying a window fault.
- A calculated margin describes its inputs and location, not every edge or concealed material.
- Match the proposed work to the identified component and moisture question.
Why is the window wet, and what needs attention first?
Water on a window can mean another morning of wiping the sill, a view that never clears, or a stain spreading beside the frame. Before choosing a replacement, find the wet surface. The glass, the sash that holds it and the surrounding frame do different jobs, and water in different places can lead to different work.
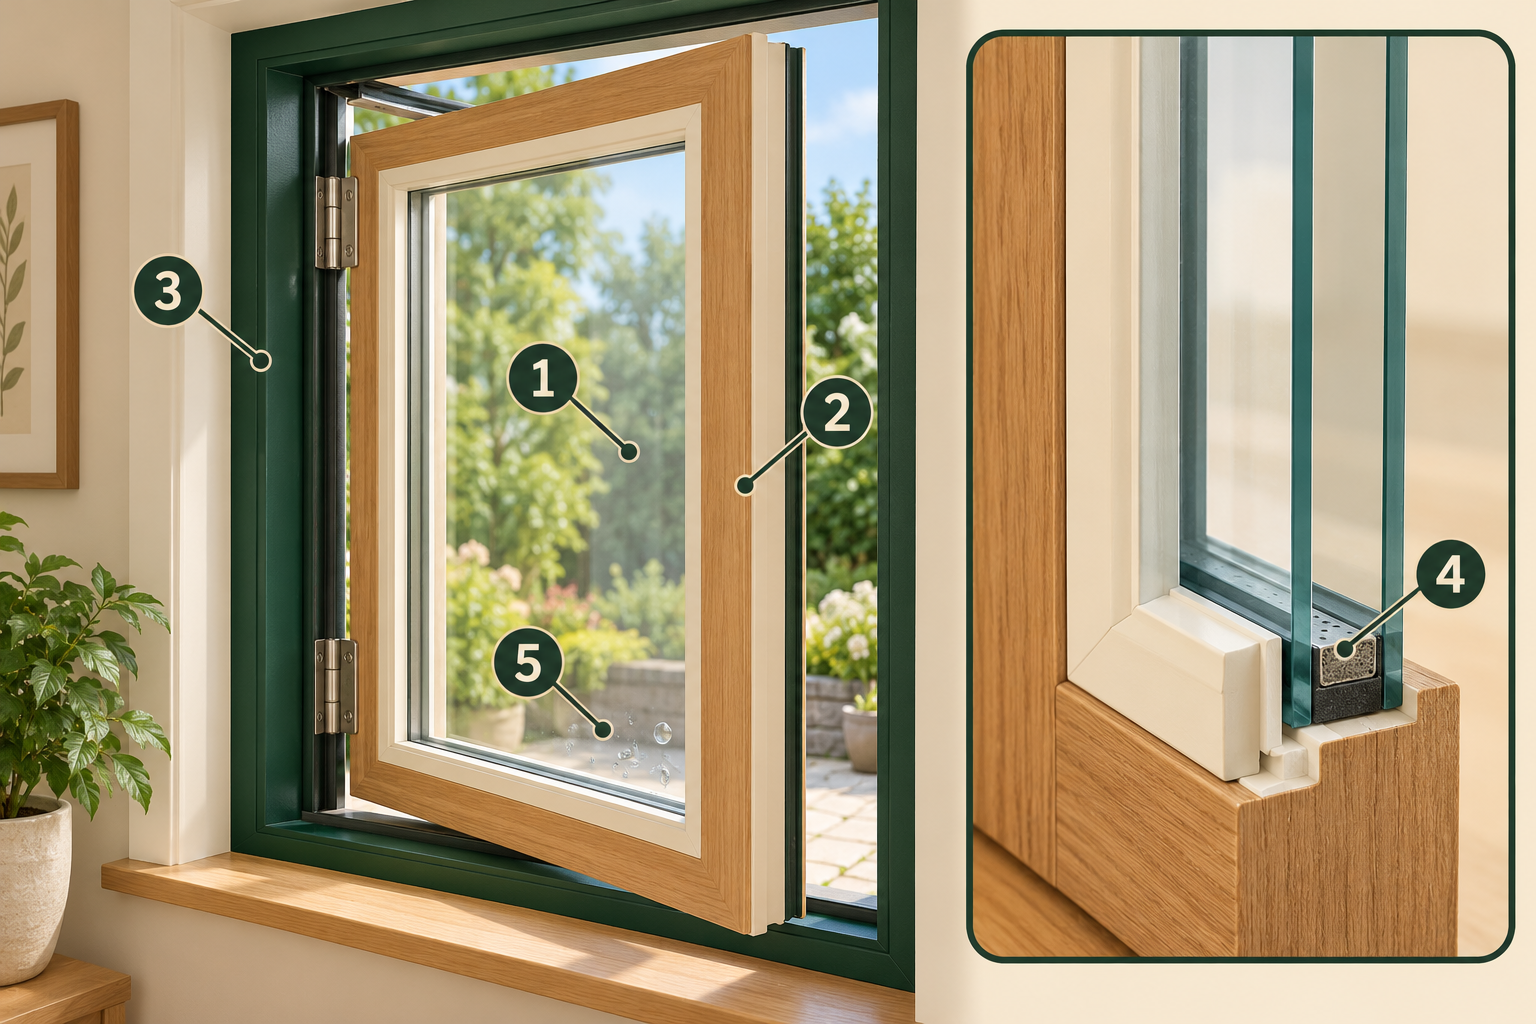
Find the glass, sash and fixed frame
The sash is the opening timber part that holds the glass; the fixed green frame stays in the wall. The close-up shows the spacer between the panes. Start by finding which glass face or surrounding part is wet.
1 · Glazing
Transparent glazing closes the glazed opening; the assembled unit is held by the sash.
2 · Moving sash
The continuous timber/cream leaf surrounds and holds the glazing and is visibly hinged relative to the fixed frame.
3 · Fixed frame
The surrounding fixed green member stays within the wall opening while the timber glazed leaf is shown partly ajar.
4 · Spacer between panes
Separates the panes at the unit edge. This illustrative section does not establish material, fill, seal technology or performance.
5 · Water beads on room-facing glass
Locates a visible wet surface in this concept; it does not establish the water source, dew point, indoor conditions or seal failure.
Condensation starts as water vapour, which is normally invisible. It becomes visible when it forms liquid droplets on a sufficiently cold surface. That explains an ordinary wet pane, but it does not automatically explain water inside the glazing or staining in the wall. More than one moisture route can be present.
Keep accessible wet glass, frames and sills dry while the source is addressed. Recurring damp finishes, spreading changes or a persistent musty smell deserve prompt attention. A long observation record or a reassuring calculator result is not a reason to leave materials wet. Observe from ordinary safe access; leave glazing, trim and concealed layers intact.
Sources for this chapter
Which surface is wet: inside, outside or between?
Room-facing droplets are on the surface exposed to the room. Exterior condensation is on the outdoor face. Moisture apparently between panes needs another distinction: is it within a sealed glazing unit, or in the space between an original window and a separate storm window? Identify that arrangement before describing every misted window as a failed seal.

Four window moisture locations
Compare moisture on the room-facing or outdoor-facing glass with moisture inside a sealed glazing gap or between a separate storm window and the main window. These locations lead to different checks. Find the wet glass face before discussing ventilation or glazing work.
1 · Room-facing surface
Beads touch the accessible room face.
2 · Outdoor-facing surface
Beads touch the outdoor face.
3 · Glass face toward sealed gap
Beads cling to glass facing the gap.
4 · Storm pane: face toward the space
Locates a wet glass face between two separately framed assemblies.
Read the complete diagram explanation
- Four window moisture locations
- Four conceptual isometric lower-edge cutaways distinguish water on room-facing glass, outdoor-facing glass, a cavity-facing glass surface in a sealed unit, and a storm pane facing the space between separately framed windows.
- Where is the water?
- Four conceptual lower-edge cutaways.
- Colour locates a wet glass surface;
- it does not establish why it is wet.
- Fixed frame
- Sash
- Edge spacer
- Glass
- 1
- Water on the room side
- ROOM
- OUTDOORS
- Enlarged lower-edge section
- Dry gap
- Room-facing surface
- Beads touch the accessible room face.
- This picture does not identify the cause.
- 2
- Water on the outdoor side
- Outdoor-facing surface
- Beads touch the outdoor face.
- The room face and sealed gap are dry.
- 3
- Water between sealed panes
- Sealed gap
- Glass face toward sealed gap
- Beads cling to glass facing the gap.
- This concept is not a seal diagnosis.
- 4
- Water in a storm-window space
- Two separately framed panes
- Storm space
- Storm pane: face toward the space
- One original single-glazed window
- plus a separate exterior storm.
- This is not a sealed two-pane unit.
- Conceptual sections, not to scale.
- No cause, seal condition or performance
- is established by these examples.
- Do not remove panes to locate water.
- Compare moisture on the room-facing or outdoor-facing glass with moisture inside a sealed glazing gap or between a separate storm window and the main window. These locations lead to different checks. Find the wet glass face before discussing ventilation or glazing work.
- Names and jobs
- 1. Room-facing surface
- 2. Outdoor-facing surface
- 3. Glass face toward sealed gap
- 4. Storm pane: face toward the space
- Locates a wet glass face between two separately framed assemblies.
- Complete picture text
- Sources and limits
- NRCan, Keeping the Heat In, chapter 8: operable and fixed windows, glazing and spacers (8.1.1 and 8.1.3), and exterior storm-window systems (8.1.11).
- Original NRCan chapter: https://natural-resources.canada.ca/energy-efficiency/home-energy-efficiency/keeping-heat-section-8-upgrading-windows-exterior-doors
- Scope: locating the wet glass face. This picture supplies no installation, pane-removal or seal-testing instructions.
- Selected conceptual configurations, not universal pane count, product profile, material, thermal rating or diagnosis. No pane is removed or opened for observation. No numerical conditions, direction of leakage, causes or performance have been inferred.
- Canadian homeowner guidance, web chapter modified 14 January 2025; sources reviewed 24 October 2026.
- Official alternate source: https://prod-natural-resources.azure.cloud.nrcan-rncan.gc.ca/energy-efficiency/home-energy-efficiency/keeping-heat-section-8-upgrading-windows-exterior-doors

Glazing is the transparent material, usually glass. In a typical insulating glass unit, two or more panes form a sealed assembly. The sash surrounds the glazing; the fixed frame surrounds the sash or fixed glazed area. Operable sashes open using hardware, while fixed glazing does not provide an opening. A separate storm window is an additional assembly rather than another pane inside that sealed unit.
From safe access, describe where you actually see water and whether the view changes with weather. A room-side drop and a stain after wind-driven rain should be recorded separately. Do not remove a pane or a seal to prove which space is wet, and do not reach outside or climb to inspect an inaccessible surface. A window provider can help identify an uncertain arrangement.
Find the surface before naming the fault
- Room-facing surfaceCompare indoor moisture with the affected cold surface. Does the described location match the visible drops?
- Inside a sealed glazing unitAsk the provider to identify the unit and confirm the moisture location. Is this a sealed-unit question rather than an accessible storm-window space?
- Separate storm-window spaceTreat the added window and the original window as a distinct arrangement. Which assembly and air routes are actually present?
- Outdoor faceRecord the morning weather and whether the moisture clears. Is the wet face truly outside, and is any other location also affected?
Surface examples identify different questions. They are not diagnoses of a home.
Sources for this comparison
Further reading: Natural Resources Canada · Keeping The Heat In - Section 8: Upgrading windows and exterior doors; Natural Resources Canada · Condensation.
Sources for this chapter
How does invisible moisture become a droplet?
The room contains water vapour from people and activities such as cooking, bathing and drying laundry. Heat moves from warmer places toward colder ones. In winter, a window can have a colder room-facing surface than the surrounding room, even while the room thermostat reports a comfortable air temperature.
Air next to that surface loses heat. As its temperature falls, the same amount of vapour represents a larger share of the saturation level at that temperature. At saturation, vapour can begin to form liquid on the surface. The dew point describes that saturation temperature for the entered air conditions. The water has not travelled through intact glass from the garden.
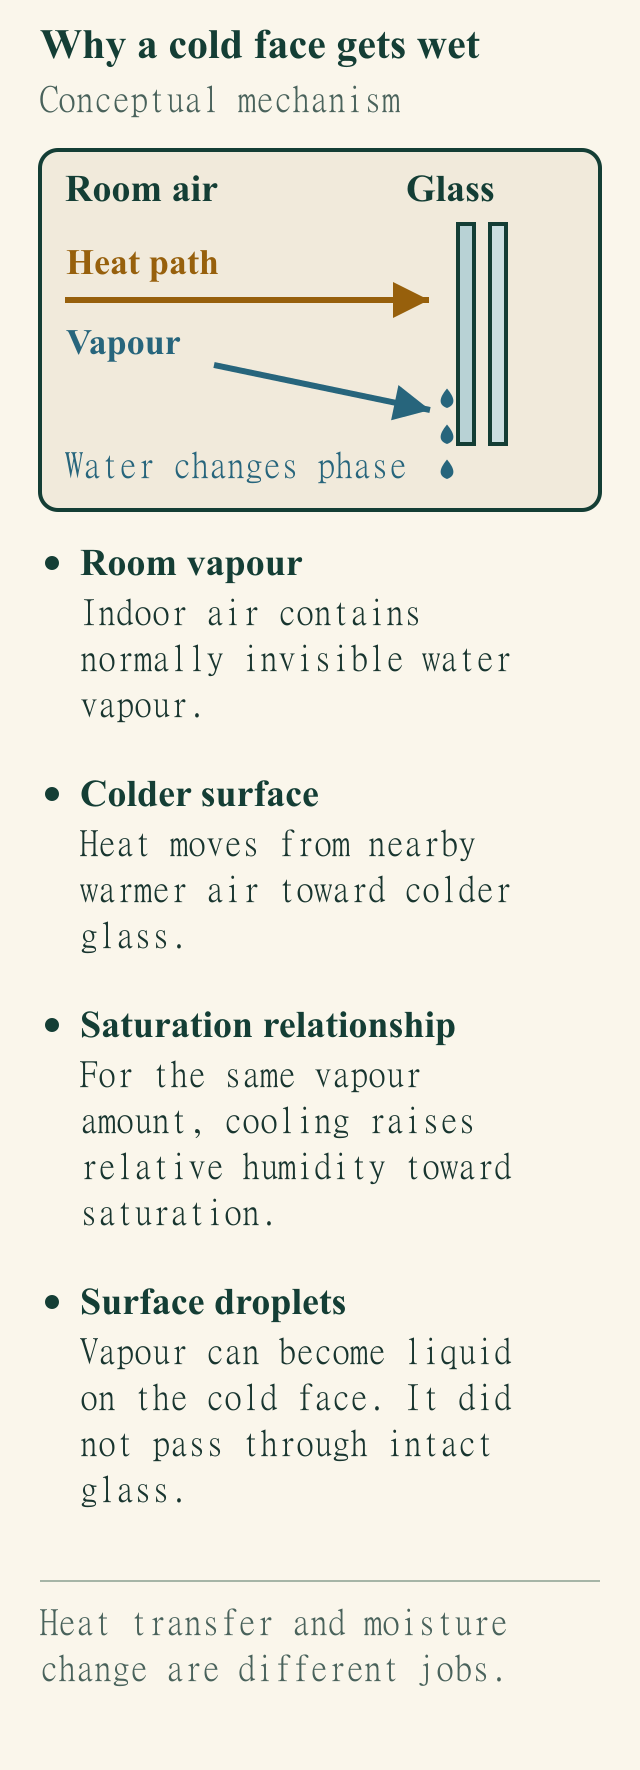
Follow heat and moisture separately
The glass can cool nearby room air enough for water vapour to form droplets. Follow heat leaving the room and vapour changing to liquid as two separate processes. The conceptual arrows do not represent water passing through intact glass.
Room vapour
Normally invisible moisture is present in the indoor air.
Colder surface
Heat leaves the nearby warmer air toward the colder window.
Saturation relationship
Cooling raises RH for that unchanged vapour amount toward saturation.
Surface droplets
Vapour can become liquid on the cold face; it has not arrived through intact glass.
Read the complete diagram explanation
- Why a cold window face gets wet
- Conceptual section: gold heat route to colder glass, blue vapour route ending in room-side droplets, followed by four named mechanism steps.
- Follow heat and moisture separately
- The glass can cool nearby room air enough for water vapour to form droplets. Follow heat leaving the room and vapour changing to liquid as two separate processes. The conceptual arrows do not represent water passing through intact glass.
- Room vapour
- Normally invisible moisture is present in the indoor air.
- Colder surface
- Heat leaves the nearby warmer air toward the colder window.
- Saturation relationship
- Cooling raises RH for that unchanged vapour amount toward saturation.
- Surface droplets
- Vapour can become liquid on the cold face; it has not arrived through intact glass.
- Complete figure text
- Why a cold face gets wet
- Conceptual mechanism
- Room air
- Glass
- Heat path
- Vapour
- Water changes phase
- Indoor air contains
- normally invisible water
- vapour.
- Heat moves from nearby
- warmer air toward colder
- glass.
- For the same vapour
- amount, cooling raises
- relative humidity toward
- saturation.
- Vapour can become liquid
- on the cold face. It did
- not pass through intact
- Heat transfer and moisture
- change are different jobs.
- Sources and limits
- Natural Resources Canada · Keeping The Heat In - Section 2: How your house works
- https://natural-resources.canada.ca/energy-efficiency/home-energy-efficiency/keeping-heat-section-2-your-house-works
- Canadian homeowner guidance, section 2.1 on heat and moisture; sources reviewed 24 October 2026.
- NOAA / National Weather Service · Wet-bulb and dewpoint temperature from air temperature and relative humidity
- https://www.weather.gov/media/epz/wxcalc/wetBulbTdFromRh.pdf
- NOAA / National Weather Service, undated two-page equation reference; sources reviewed 24 October 2026.
- Dew-point equation and units only. The wet-bulb and Skew-T procedures are outside this example.
- NOAA / National Weather Service · Vapor Pressure
- https://www.weather.gov/media/epz/wxcalc/vaporPressure.pdf
- NOAA / National Weather Service, undated one-page vapour-pressure reference; sources reviewed 24 October 2026.
- Linked conversion sheets are outside this example.
- These conceptual heat and moisture paths are not measurements of a home or an instrument-accuracy statement, and do not prescribe a humidity target.
Relative humidity, or RH, compares the actual water-vapour pressure with the saturation vapour pressure at the same temperature. A room-air RH reading therefore needs its temperature beside it. It is not a surface-temperature reading, and identical RH percentages in rooms at different temperatures do not necessarily give identical dew points.
This connects two useful questions: how moist is the air beside the window, and how cold is the affected surface? A photograph of droplets cannot answer both. Extremely cold conditions can produce frost instead of an ordinary liquid film. The location and conditions matter more than a general label such as bad windows.
Sources for this chapter
Why do drops often start along the lower edge?
The centre of a pane, the glass edge and the frame are different parts of the heat-flow path. The spacer keeps panes separated at the edge of an insulating glass unit. NRCan explains that traditional conductive spacers can contribute to edge heat loss, while thermally improved spacers reduce that path. A clear centre can therefore coexist with a colder, wet perimeter.
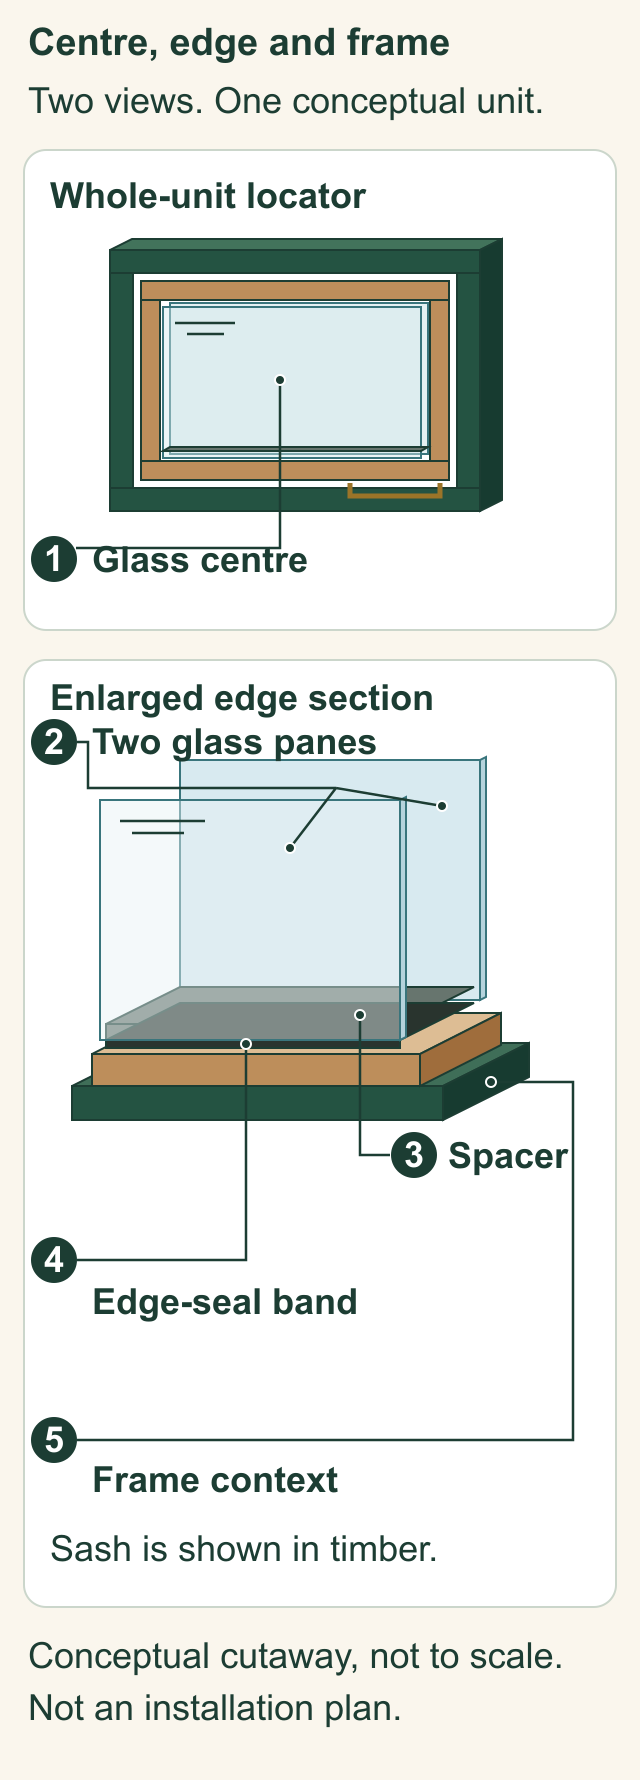
Glass centre and assembled edge parts
The glass centre, edge spacer, sash and fixed frame are separate parts. The close-up shows how the edge is assembled. When only the lower edge is wet, ask which surface temperature has actually been measured.
1 · Glass centre
Names the broad central glass location. A reading here does not describe every edge.
2 · Two glass panes
Two separate flat sheets enclose the selected two-pane unit; the opaque lower edge parts are not another glass sheet.
3 · Spacer
The edge component separates the panes. Its illustrated profile does not identify an actual product or material.
4 · Edge-seal band
Opaque edge material is shown as a distinct part of the sealed-unit edge, not glass. Actual edge sealing construction varies.
5 · Frame context
The green surround is outside the glazing and timber sash. It is distinct from the spacer within the unit.
Read the complete diagram explanation
- Glass centre and assembled edge parts
- A whole-window locator marks the glass centre. A separate enlarged isometric lower-edge section shows two independent flat panes, opaque spacer between their edges, opaque edge-seal band, timber sash and surrounding green frame context.
- The glass centre, edge spacer, sash and fixed frame are separate parts. The close-up shows how the edge is assembled. When only the lower edge is wet, ask which surface temperature has actually been measured.
- Names and jobs
- Glass centre
- Names the broad central glass location. A reading here does not describe every edge.
- Two glass panes
- Two separate flat sheets enclose the selected two-pane unit; the opaque lower edge parts are not another glass sheet.
- Spacer
- The edge component separates the panes. Its illustrated profile does not identify an actual product or material.
- Edge-seal band
- Opaque edge material is shown as a distinct part of the sealed-unit edge, not glass. Actual edge sealing construction varies.
- Frame context
- The green surround is outside the glazing and timber sash. It is distinct from the spacer within the unit.
- Complete figure text
- Centre, edge and frame
- Two views. One conceptual unit.
- Whole-unit locator
- 1
- Enlarged edge section
- 2
- 3
- 4
- 5
- Sash is shown in timber.
- Conceptual cutaway, not to scale.
- Not an installation plan.
- Source and limits
- NRCan, Keeping the Heat In, chapter 8: parts and glazing (8.1.1 and 8.1.3), whole-window versus centre/edge distinctions (8.1.4), and condensation location (8.1.7). Section 2.1 supports the heat and moisture explanation; no numeric heat path is drawn here.
- Original NRCan chapter: https://natural-resources.canada.ca/energy-efficiency/home-energy-efficiency/keeping-heat-section-8-upgrading-windows-exterior-doors
- Canadian homeowner guidance, web chapter modified 14 January 2025; sources reviewed 24 October 2026.
- This is an assembled conceptual section, not a pane-removal or installation sequence. Two panes are selected for this example; other assemblies differ. No universal gap, material, seal technology, performance, warmth gradient, instrument reading, moisture source, leak, seal-failure finding or DIY remedy is established. Only actual assessment and matching product information can establish an actual assembly or work scope.
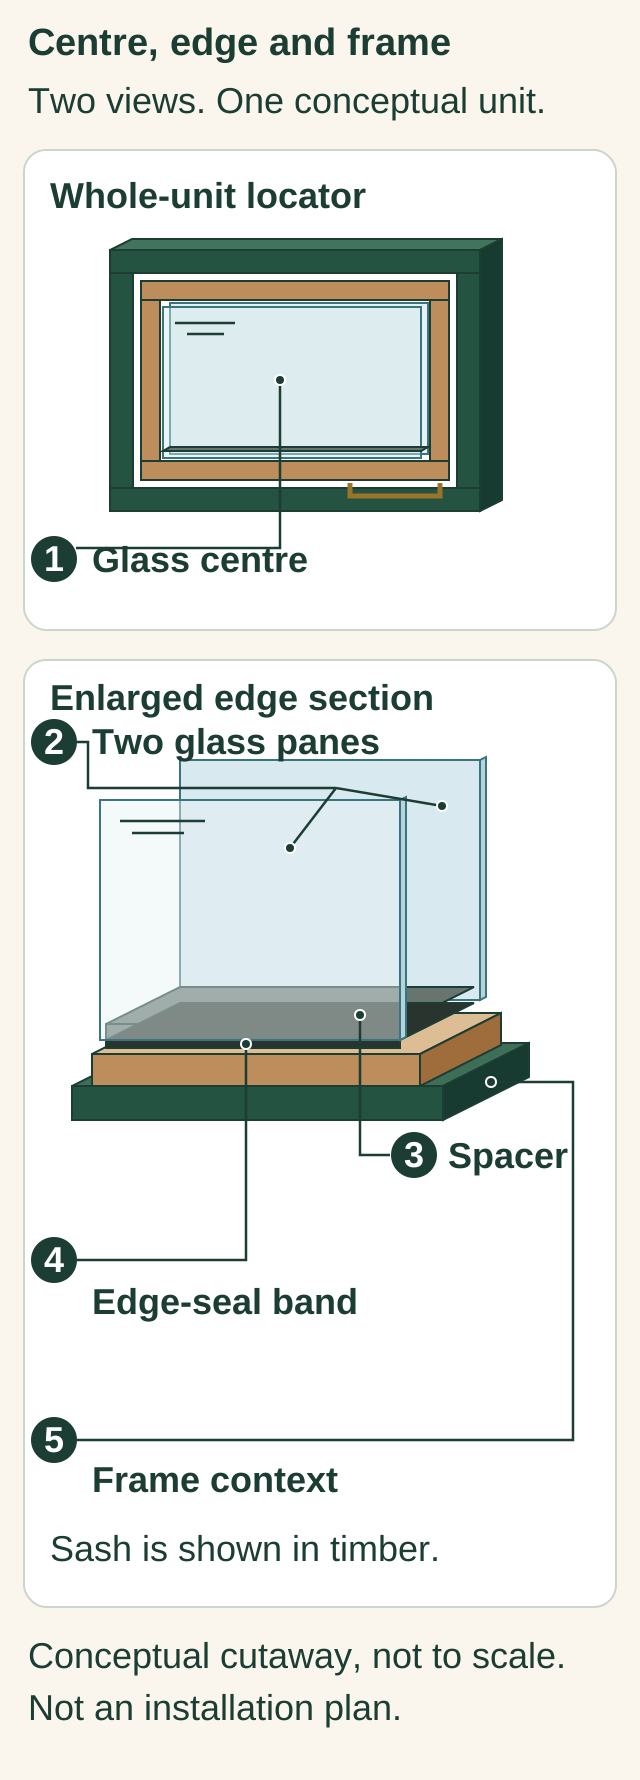
The whole product also includes its frame, sash and seals. The colour of a frame, the number of visible panes or a marketing photograph does not identify every material, coating or gas fill. Ask for the actual product information if those details matter to a proposal. The conceptual edge section shows why locations can differ; it is not a thermal scan of a home.
Compare a recurring lower-edge pattern with the particular room, weather and covering position. Differences between windows can involve their construction, nearby air movement and exposure. The wettest window is a useful place to investigate, but its appearance alone does not rank every window or establish the temperature at every corner.
Sources for this chapter
Can moisture on the outdoor face be a different story?
Yes. NRCan describes exterior condensation around sunrise when a night has been cool and calm and the outdoor air is humid. Efficient glazing can reduce heat reaching the outside pane from the room. The outdoor surface can then be cool enough for outdoor moisture to condense on it. This is a different location and moisture supply from room-side droplets.
That explanation does not identify the coating, performance rating or condition of a particular window from a photograph. Confirm the face on which the moisture appears and whether the pattern clears as conditions change. Persistent obscuration apparently within a sealed unit still needs the unit question; rain-linked water around a frame still needs the water-entry question.
Keep the distinction in a service request. An outside surface that becomes wet on some mornings, an inaccessible misted cavity and a wet interior sill are not interchangeable observations. Where the surface cannot be identified safely, describe the uncertainty and ask the window provider how it can be checked without disturbing the glazing.
Sources for this chapter
What do curtains, deep sills and nearby heating change?
Room air carries heat toward the room-facing glass. Deep sills, closed coverings and furniture can restrict that movement, leaving a colder pocket beside the window. NRCan identifies this circulation relationship as one reason heating outlets are often located below glazing. The covering is part of the local conditions, even though it is not part of the sealed glass unit.
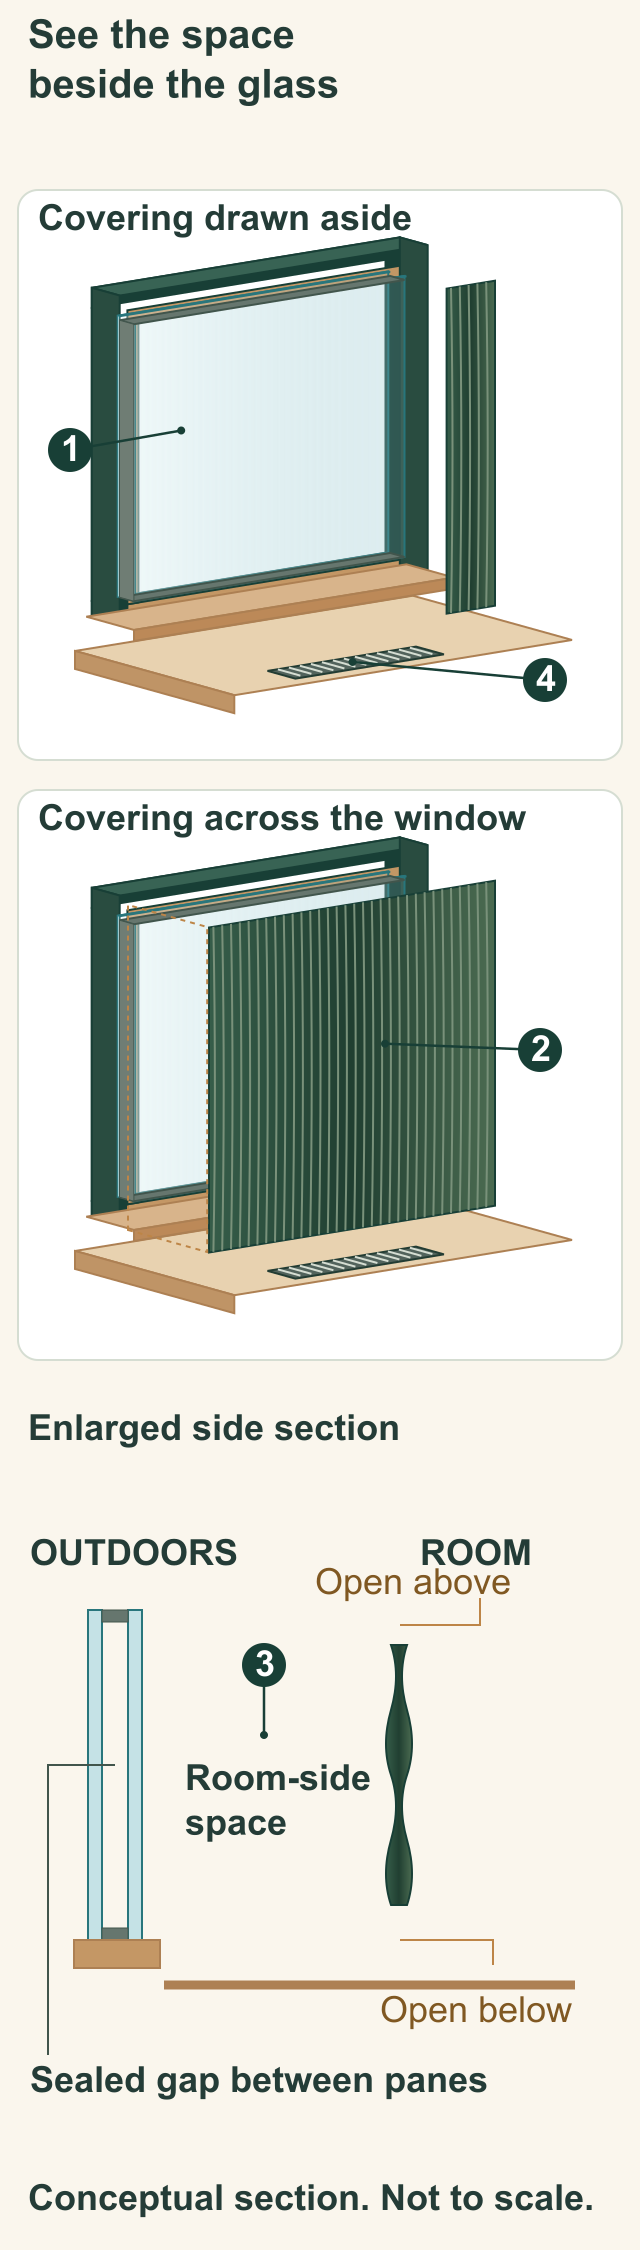
Window coverings and room-side space
A curtain or blind creates another space on the room side of the glass. Compare that space with the sealed gap between the panes. Ask whether the covering arrangement is limiting room air reaching the window; the drawing does not prescribe a universal clearance.
1 · Room-facing glass
The inner glass sheet faces the room. The other glass sheet and the sealed gap belong to the glazing unit.
2 · Covering fabric
The cloth hangs on the room side of the window. Its drawn-aside and across-window positions leave different portions of the window exposed to the room.
3 · Room-side space
This is the separate space between the inner glass and cloth, not the sealed space between panes. The enlarged section shows unsealed edges above and below the cloth; it does not establish air movement.
4 · Air grille
The visible floor grille is clear of fabric in both models. Its supply, return or other function and its operation have not been identified.
Read the complete diagram explanation
- Window coverings and room-side space
- Matched isometric window models and an enlarged side section distinguish two glass sheets and their sealed gap from the separate space between the room-facing glass and curtain. Open edges are visible, with no arrows or claim of air movement.
- See the space
- beside the glass
- Covering drawn aside
- 1
- 4
- Covering across the window
- 2
- Enlarged side section
- OUTDOORS
- ROOM
- 3
- Room-side
- space
- Open above
- Open below
- Sealed gap between panes
- Conceptual section. Not to scale.
- Conceptual comparison of two covering positions and the separate room-side space.
- Window coverings: see the separate room-side space
- Near-window air circulation matters because air can exchange heat with glass. A covering or deep sill can restrict that circulation. This drawing locates the parts and spaces to discuss; it does not measure the flow or diagnose why a particular window is wet.
- A curtain or blind creates another space on the room side of the glass. Compare that space with the sealed gap between the panes. Ask whether the covering arrangement is limiting room air reaching the window; the drawing does not prescribe a universal clearance.
- Four parts and their jobs
- 1 · Room-facing glass
- The inner glass sheet faces the room. The other glass sheet and the sealed gap belong to the glazing unit.
- 2 · Covering fabric
- The cloth hangs on the room side of the window. Its drawn-aside and across-window positions leave different portions of the window exposed to the room.
- 3 · Room-side space
- This is the separate space between the inner glass and cloth, not the sealed space between panes. The enlarged section shows unsealed edges above and below the cloth; it does not establish air movement.
- 4 · Air grille
- The visible floor grille is clear of fabric in both models. Its supply, return or other function and its operation have not been identified.
- Useful questions at the window
- Where is the water: on the room-facing glass, outside, or between glass layers? What covering, sill and nearby objects affect access to the window? What does the actual product guidance require, and what observation or assessment would distinguish moisture, glass-temperature and water-entry questions?
- What this example cannot establish
- The profiles and spaces are enlarged to make them visible. They are not dimensions, a required clearance, a manufacturer section or an installation recipe. No arrow shows an air direction. An opening in this concept is not a measurement, and a visible grille does not establish heating or ventilation operation. Keep coverings clear of actual equipment and follow its applicable product instructions; this picture supplies no clearance number.
- Read every word in the drawing
- See the space beside the glass
- One window. Two covering positions.
- Room-side space is not the sealed gap.
- Same glass, frame, sill and grille.
- Different spaces, shown apart.
- This is a cut view, not a removal step.
- Between glass
- and covering
- Small sealed gap between panes
- Two separate glass sheets.
- Edge spacers sit between their edges.
- Conceptual geometry; spaces enlarged.
- No gap size or clearance is specified.
- Visible openings do not prove airflow.
- The grille type and operation are unknown.
- This is not a condensation diagnosis
- or a promise that a covering change fixes it.
- Sources and scope
- Natural Resources Canada · Condensation
- Canadian homeowner guidance on condensation and near-window air circulation. Page modified 16 January 2025; sources reviewed 24 October 2026.
- Natural Resources Canada · Keeping The Heat In - Section 8: Upgrading windows and exterior doors
- Canadian homeowner guidance, current web chapter on window components and retrofit scopes. Chapter modified 14 January 2025; sources reviewed 24 October 2026.
- Source links: https://natural-resources.canada.ca/energy-efficiency/product-energy-ratings/condensation ; https://natural-resources.canada.ca/energy-efficiency/home-energy-efficiency/keeping-heat-section-8-upgrading-windows-exterior-doors
A heavy curtain may reduce the exchange between the room and the window space. This helps explain why changing the covering position can change a pattern without altering the glass. It does not mean that every blind should stay open at every time, or that a covering change repairs a defective unit or a water-entry detail.
Keep heating outlets and nearby equipment appropriately clear under their actual instructions. Do not place a portable heater against glass, cover an outlet, or invent a clearance from an illustration. Record the ordinary covering and furniture arrangement when discussing recurring moisture so the assessor can consider the window in the room where it operates.
A feeling of cool air beside the window is not by itself proof of an opening to outdoors. Air can cool at the glass and circulate within the room. Leakage through a joint is a separate route. The window-operation guide covers hardware and weather-seal questions; a building-envelope assessment can help distinguish an uncertain leak from local circulation.
Sources for this chapter
Where is the room moisture coming from, and where can it leave?
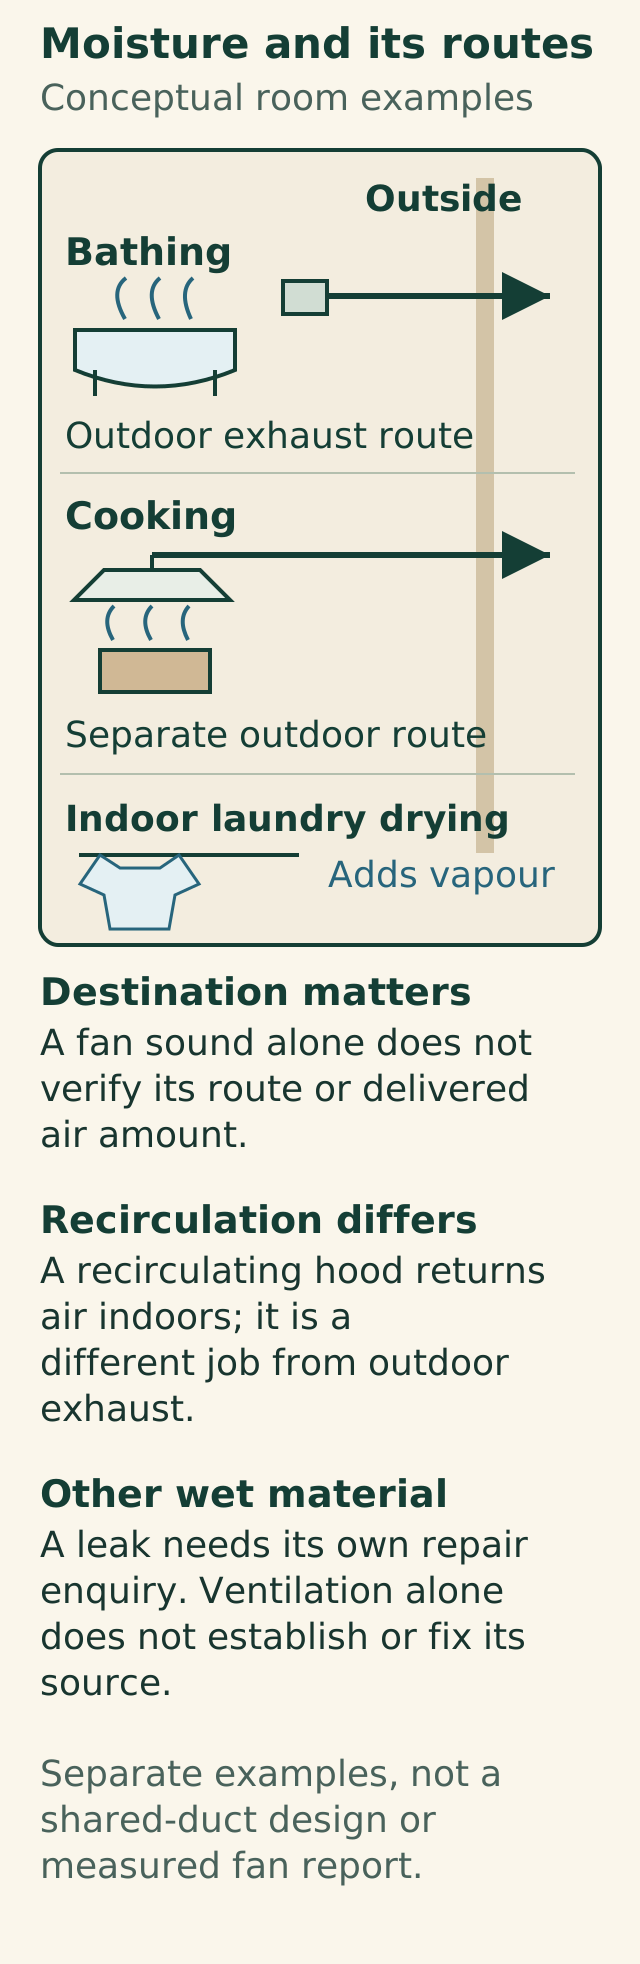
Cooking, showers, occupants, indoor laundry drying and humidifier use can add moisture to the home. A leak or wet building material introduces another source. Start with the actual activities and conditions rather than assuming that a room-side droplet means the entire house needs the same equipment adjustment.
A bathroom exhaust or outdoor-vented kitchen hood has a route to move moist indoor air outside. A recirculating appliance and an outdoor exhaust do different jobs. Health Canada recommends effective exhaust and checking that it goes outdoors. Fan noise alone does not establish the route or the amount of air delivered through it.
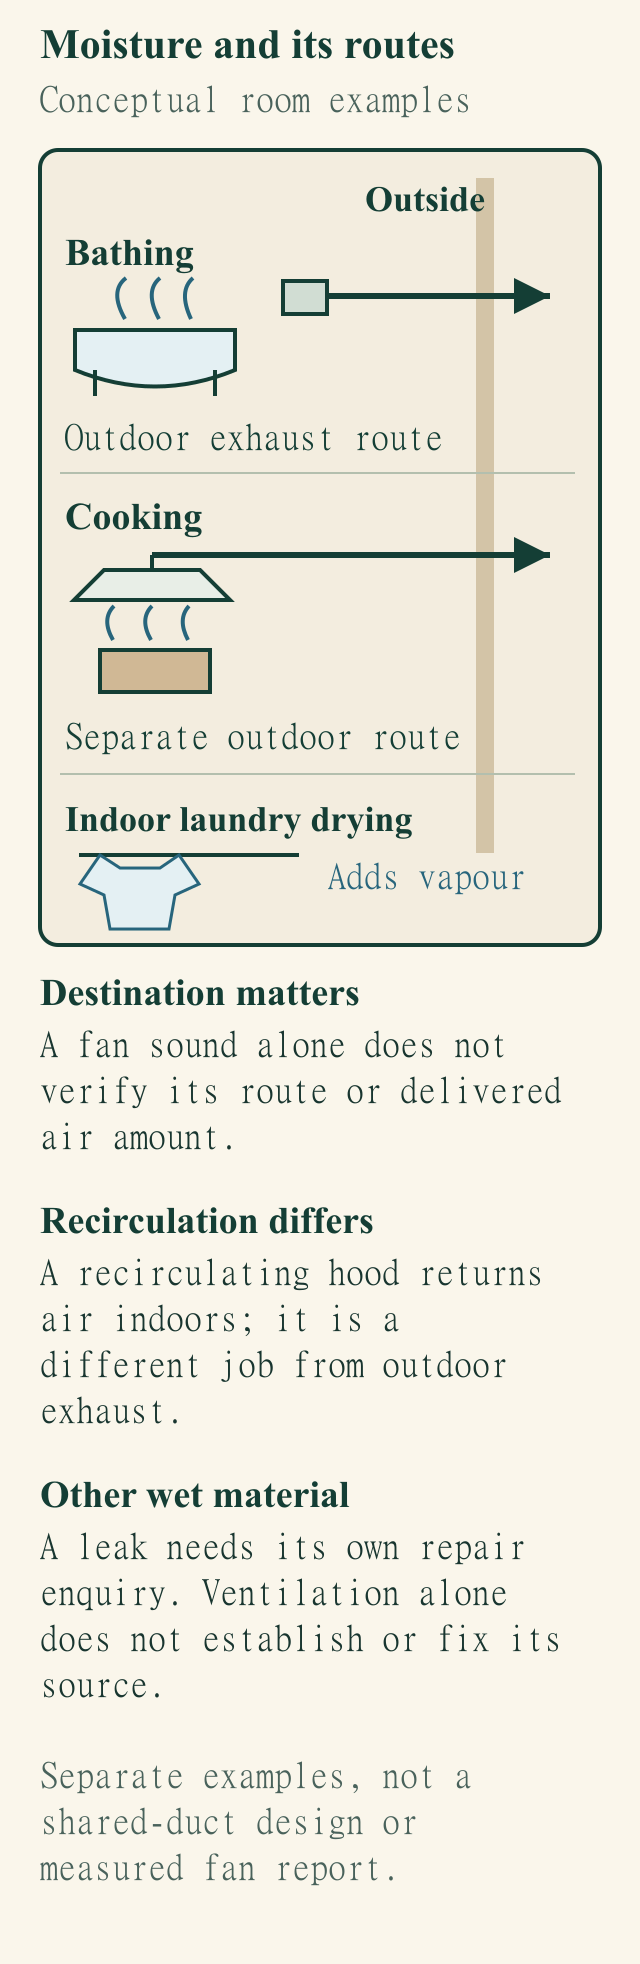
Match a source to a real removal route
Bathing, cooking and indoor laundry drying add moisture in different places. An outdoor exhaust has a destination outside; recirculation is a different job. The illustrated routes explain the questions to ask, not measured fan performance.
Bathroom source
Bathing adds indoor moisture; the exhaust enquiry includes its outdoor destination.
Kitchen source
Cooking moisture and an outdoor-vented hood belong to a source-and-route question.
Indoor laundry
Drying wet items can add moisture to room air.
Outdoor destination
A fan sound does not verify the route or delivered air amount.
Other wet material
A leak requires its own repair scope rather than only a ventilation change.
Read the complete diagram explanation
- Match a moisture source to its real removal route
- Recognizable bath and cooking vignettes have independent conceptual outdoor routes. Indoor laundry adds vapour; recirculation and leak repair are different questions.
- Match a source to a real removal route
- Bathing, cooking and indoor laundry drying add moisture in different places. An outdoor exhaust has a destination outside; recirculation is a different job. The illustrated routes explain the questions to ask, not measured fan performance.
- Bathroom source
- Bathing adds indoor moisture; the exhaust enquiry includes its outdoor destination.
- Kitchen source
- Cooking moisture and an outdoor-vented hood belong to a source-and-route question.
- Indoor laundry
- Drying wet items can add moisture to room air.
- Outdoor destination
- A fan sound does not verify the route or delivered air amount.
- Other wet material
- A leak requires its own repair scope rather than only a ventilation change.
- Complete figure text
- Moisture and its routes
- Conceptual room examples
- Outside
- Bathing
- Outdoor exhaust route
- Cooking
- Separate outdoor route
- Indoor laundry drying
- Adds vapour
- Destination matters
- A fan sound alone does not
- verify its route or delivered
- air amount.
- Recirculation differs
- A recirculating hood returns
- air indoors; it is a
- different job from outdoor
- exhaust.
- A leak needs its own repair
- enquiry. Ventilation alone
- does not establish or fix its
- source.
- Separate examples, not a
- shared-duct design or
- measured fan report.
- Sources and limits
- Natural Resources Canada · Keeping The Heat In - Section 2: How your house works
- https://natural-resources.canada.ca/energy-efficiency/home-energy-efficiency/keeping-heat-section-2-your-house-works
- Canadian homeowner guidance, section 2.1 on heat and moisture; sources reviewed 24 October 2026.
- The heat and moisture explanation uses section 2.1; other sections are outside this source scope.
- Health Canada · Guide to addressing moisture and mould indoors
- https://www.canada.ca/en/health-canada/services/publications/healthy-living/addressing-moisture-mould-your-home.html
- Health Canada, Guide to addressing moisture and mould indoors, January 2023; sources reviewed 24 October 2026.
- General Canadian moisture guidance. It does not turn a window observation into a personal health diagnosis or a cleanup procedure.
- The routes are conceptual. Fan noise does not establish delivered airflow, and this example prescribes no universal humidity target.
Use installed ventilation and moisture-control equipment according to its matching instructions. If the route, controls or performance are uncertain, ask the appropriate provider to identify them. This guide does not supply a universal fan speed, operating schedule, humidifier setting or duct change. The HRV/ERV guide explains recovery ventilation without turning a wet pane into a commissioning result.
Condensation can also coexist with rain entry or a plumbing leak. Improving ventilation does not repair those sources. If dampness persists, the assessment should connect the visible location with the possible moisture routes, rather than asking one piece of equipment to answer every window and wall question.
Sources for this chapter
Would a lower humidity reading or tighter window settle the problem?
Lowering moisture in the air can lower its dew point, while a warmer surface can reduce condensation potential. These are different levers. Neither a single RH number nor one replacement specification guarantees that every Canadian window will remain dry through all outdoor conditions and room uses.
Health Canada gives general indoor-moisture guidance. A cold-window question also depends on the actual surface temperature, outdoor conditions and assembly. Avoid treating a broad household range as a pass mark for a particular glass edge. A qualified assessment can consider the moisture source, comfort, ventilation and the window together.
Airtightness changes can affect that balance. NRCan notes that old leaky windows may have allowed moisture to escape, and that condensation can worsen after tighter replacements if ventilation is not considered. The useful response is to include the connected ventilation question in the work, not to preserve uncontrolled leakage as a moisture-control system.
Sources for this chapter
What can the dew-point calculator actually explain?
The calculator compares entered air conditions with an entered surface temperature. Enter room-air temperature in degrees Celsius and RH in percent. The dew point is calculated from those air inputs using the retained NOAA vapour-pressure formulation. Surface margin means surface temperature minus calculated dew point; its unit here is degrees Celsius.
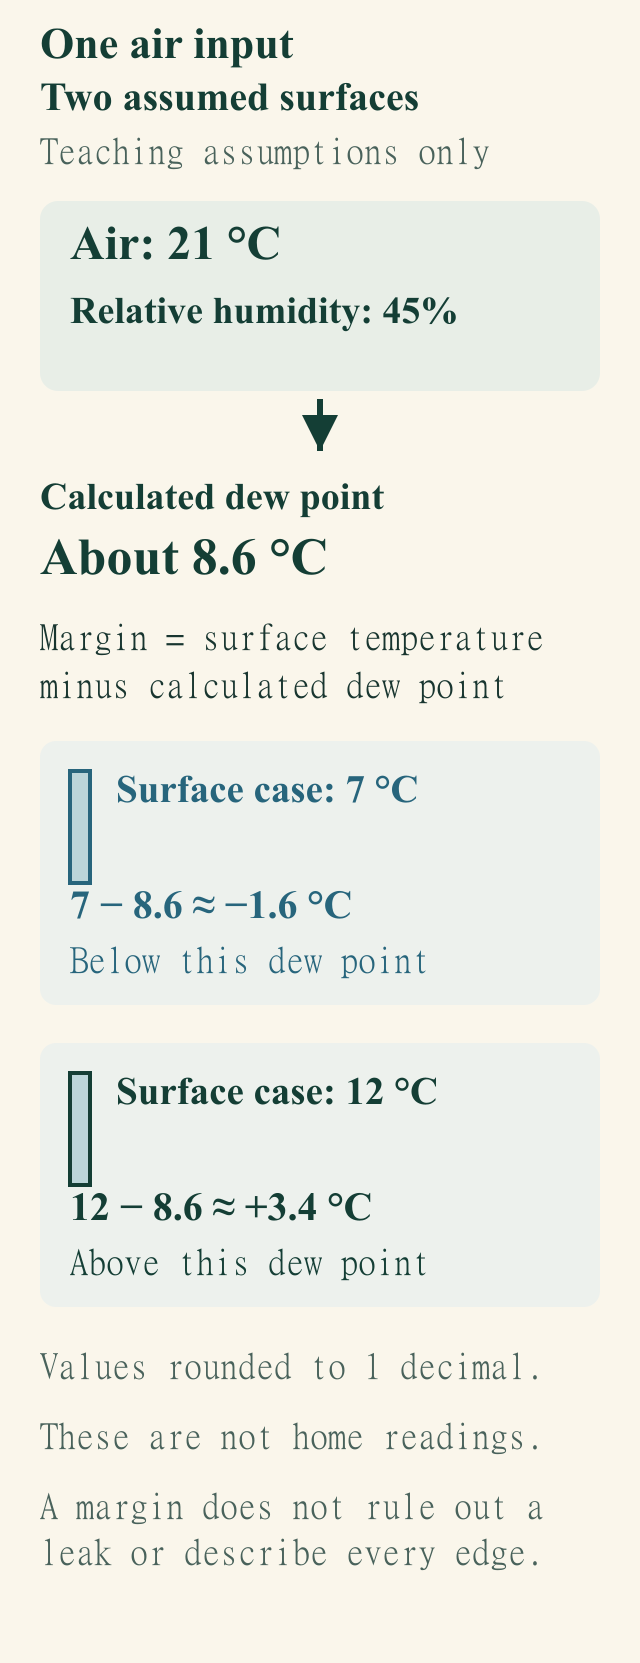
Consider two explicitly assumed surface cases for the same assumed room-air conditions: 21°C and 45% RH. The calculated dew point is about 8.6°C. An assumed 7°C surface gives a margin of about −1.6°C; an assumed 12°C surface gives about +3.4°C. The first supports condensation potential under the simplified entered conditions; the second is above the calculated dew point.
One air input, two assumed surfaces
At assumed 21 °C and 45% RH, the calculation gives a dew point of about 8.6 °C. Surfaces at 7 °C and 12 °C give margins of −1.6 °C and +3.4 °C. These are assumed examples, not readings taken in a home.
Air input
Assumed 21 °C and 45% RH describe the same assumed room-air conditions.
Calculated dew point
About 8.6 °C is derived from those inputs using the retained NOAA formulation.
Surface case 7 °C
The assumed margin is about −1.6 °C.
Surface case 12 °C
The assumed margin is about +3.4 °C.
Limit
A calculation describes entered conditions, not every edge or an excluded water-entry route.
Read the complete diagram explanation
- One assumed air condition and two surface-temperature cases
- Assumed 21 °C and 45% RH give a dew point of about 8.6 °C. Assumed 7 °C and 12 °C surfaces give rounded margins of −1.6 °C and +3.4 °C. These are examples, not readings taken in a home.
- One air input, two assumed surfaces
- At assumed 21 °C and 45% RH, the calculation gives a dew point of about 8.6 °C. Surfaces at 7 °C and 12 °C give margins of −1.6 °C and +3.4 °C. These are assumed examples, not readings taken in a home.
- Air input
- Assumed 21 °C and 45% RH describe the same assumed room-air conditions.
- Calculated dew point
- About 8.6 °C is derived from those inputs using the retained NOAA formulation.
- Surface case 7 °C
- The assumed margin is about −1.6 °C.
- Surface case 12 °C
- The assumed margin is about +3.4 °C.
- Limit
- A calculation describes entered conditions, not every edge or an excluded water-entry route.
- Complete figure text
- One air input
- Two assumed surfaces
- Teaching assumptions only
- Air: 21 °C
- Relative humidity: 45%
- About 8.6 °C
- Margin = surface temperature
- minus calculated dew point
- Surface case: 7 °C
- 7 − 8.6 ≈ −1.6 °C
- Below this dew point
- Surface case: 12 °C
- 12 − 8.6 ≈ +3.4 °C
- Above this dew point
- Values rounded to 1 decimal.
- These are not home readings.
- A margin does not rule out a
- leak or describe every edge.
- Sources and limits
- NOAA / National Weather Service · Wet-bulb and dewpoint temperature from air temperature and relative humidity
- https://www.weather.gov/media/epz/wxcalc/wetBulbTdFromRh.pdf
- NOAA / National Weather Service, undated two-page equation reference; sources reviewed 24 October 2026.
- Dew-point equation and units only. Wet-bulb, Skew-T and linked weather procedures are outside this example.
- NOAA / National Weather Service · Vapor Pressure
- https://www.weather.gov/media/epz/wxcalc/vaporPressure.pdf
- NOAA / National Weather Service, undated one-page vapour-pressure reference; sources reviewed 24 October 2026.
- Linked conversion sheets are outside this example.
- Assumed inputs illustrate the calculation. They do not establish a home’s condition, instrument accuracy or a universal humidity target.
Those are teaching inputs, not measurements of a window or an instruction to alter a control. The calculation does not locate the coldest edge, identify a broken seal or exclude simultaneous rain entry. A positive margin at one assumed or measured point cannot clear a different point that is wet.
The graph varies RH while holding room temperature constant. More vapour at that temperature raises the dew point; a colder surface leaves less margin. Keep the input values, units and whether they were assumed or observed with a saved result. A changing graph is a relationship to understand, not a forecast of every surface in the house.
See the assumed surface-temperature example
Sources for this chapter
Why can a careful-looking measurement still mislead?
A hygrometer reports RH near its sensor. A surface thermometer addresses a surface at a particular location. Record the air temperature, RH, surface location and time together, using the actual equipment instructions. Yesterday’s room reading and today’s edge reading may describe different conditions even if the calculation accepts both numbers.
Infrared instruments infer surface temperature from emitted infrared energy. Emissivity describes a surface’s emission behaviour. The retained Fluke 59 MAX / 59 MAX+ manual warns about reflective objects and provides material-dependent values; it is a named instrument example, not a universal setting for every glass or coating.
A decimal on a display describes its resolution, not a guarantee of that same accuracy on reflective glass. Do not invent a correction, apply a surface treatment or use a laser procedure from this guide. If a decision depends on a small margin, ask a qualified person to choose a suitable measurement method and explain its limitations.
Location matters alongside instrument suitability. A centre-of-glass reading may not describe the wet edge, and a room sensor elsewhere may not describe the air immediately beside the pane. Where the uncertainty could change the conclusion, preserve it. Visible recurring wetting still needs attention while better observations are arranged.
Sources for this chapter
Which visible changes deserve more than another wipe?
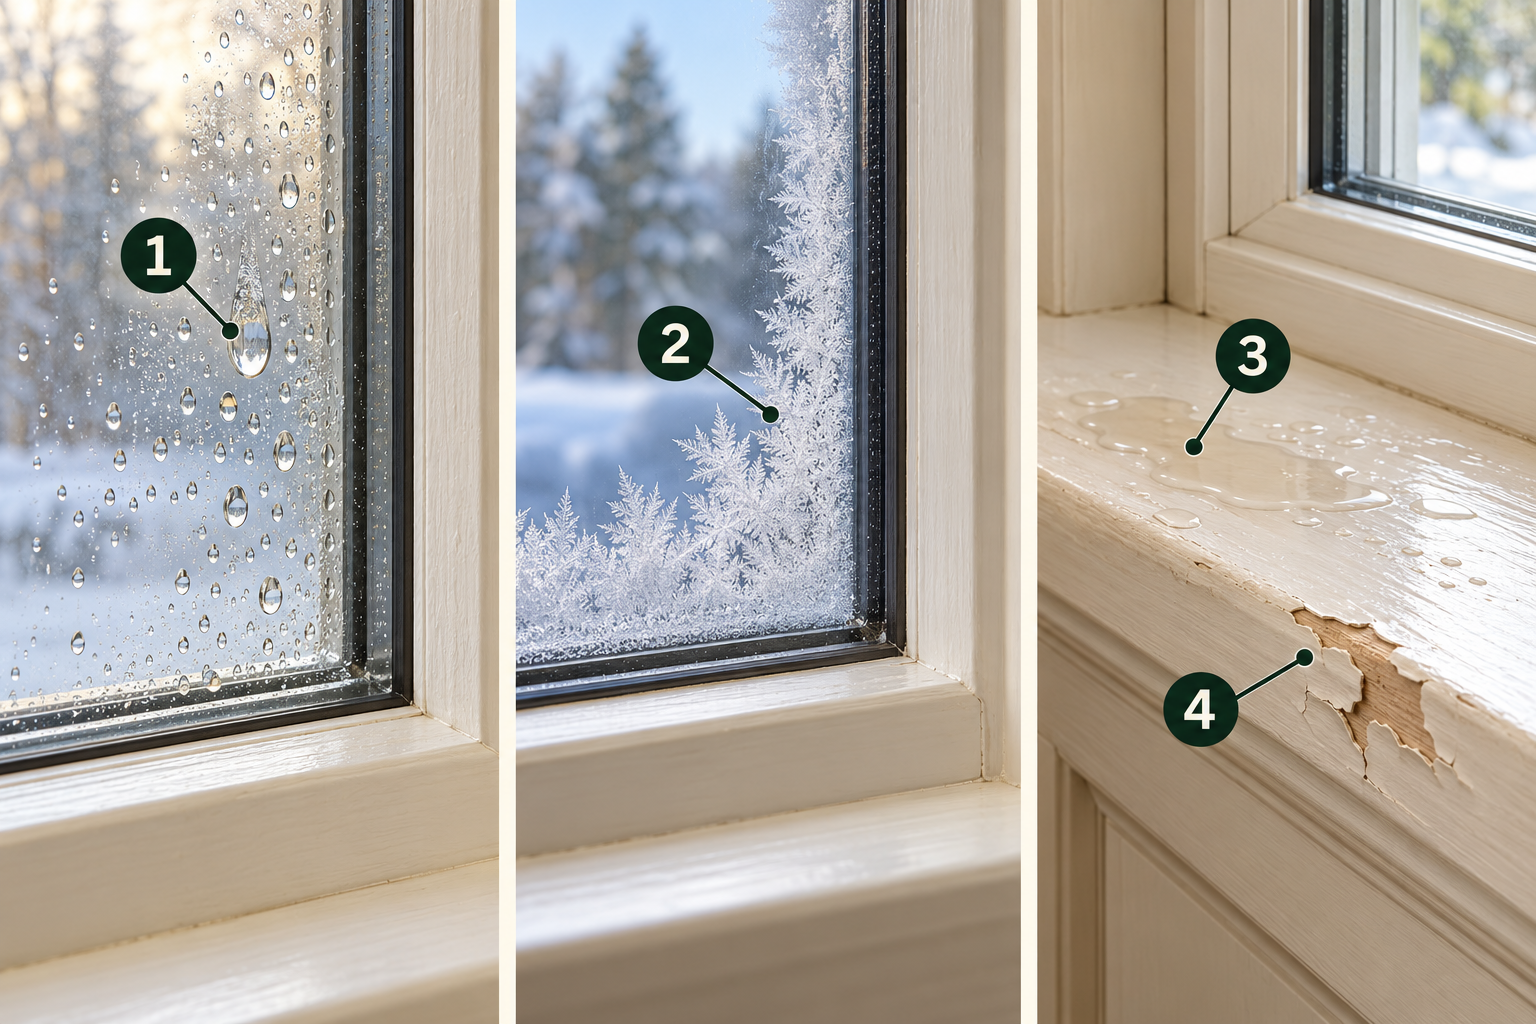
Drops, edge frost, a wet sill and changing paint are useful observations because they identify the part affected. They are not equivalent findings. Water sitting on glass, water repeatedly soaking a finish and a stain extending beyond the frame lead to different questions about the materials and source.
Name the visible change
Droplets on glass, frost along an edge, water collecting on the sill and peeling paint are different visible changes. Use these illustrative close-ups to name what you see, then note where water appears and what was happening at the time.
1 · Drops on glass
Visible liquid drops cling to the illustrated glass surface. Their appearance does not locate that surface within a real window assembly or identify why it became wet.
2 · Crystalline edge frost
The edge pattern is visibly different from the liquid drops. It supplies no temperature, sealed-unit fault or measured performance result.
3 · Water on the sill
A visible pool wets the horizontal painted sill. The image does not establish the source, duration or condition below the accessible surface.
4 · Peeling finish
Lifted paint exposes part of the underlying surface. This is a visible finish change, not proof of concealed decay, mould species or a health finding.
Health Canada identifies staining, peeling finishes, dampness and musty odours as reasons to investigate moisture. A stain or dark patch cannot establish mould species, hidden extent or personal health effects from its appearance. Where mould returns, hidden contamination is suspected or the source is unclear, obtain appropriately experienced professional help.
Keep people safe while describing the problem. Do not open a wall, dismantle glazing, disturb suspect material or lean outside to recreate the event. For health concerns, consult a healthcare professional. A window record can support a building enquiry, but it is not a health clearance or a reason to delay needed help.
Sources for this chapter
What can I do while the cause is being investigated?
Dry accessible wet glass, frames and sills so the water does not continue soaking adjacent finishes. Use the existing outdoor exhaust and other equipment within their instructions, and note moisture-producing activities or leaks. These actions manage accessible moisture; they do not establish which concealed layer or glazing component needs work.
Keep the ordinary room-air route to the window reasonably clear while respecting the heating equipment and covering instructions. A simple comparison of ordinary covering positions can provide context without becoming a test certificate. Do not deliberately create a wet condition, obstruct heating or operate unfamiliar equipment to reproduce a symptom.
Promptly address a known leak through the appropriate repair scope. If materials remain wet, changes spread or an odour persists, seek help rather than repeating the same drying routine indefinitely. Mould cleanup, contaminated water and concealed damage have their own safety and remediation requirements; this page is not a cleanup procedure.
Sources for this chapter
Which part would the proposed repair actually change?
A sealed-glazing replacement addresses the glazing unit within an identified window arrangement. Operation or weather-seal work addresses moving parts, hardware or the contact between sash and frame. Neither description automatically includes the surrounding wall interface, every source of indoor moisture or all concealed damage.

Which part would the work change?
A contact-seal job, sealed glass-unit job, insert replacement and full-frame replacement change different components. The green retained frame and blue new frame distinguish the two replacement extents. Ask which parts stay, which come out and what happens at the surrounding wall.
1 · Weatherstrip / contact seal
Changes: the identified contact seal between sash and frame. Retained: green outer frame, timber sash and glazing. This does not replace the sealed glass unit or assess the wall.
2 · Sealed glass-unit scope
Changes: the assembled panes, spacer and sealed-unit edge. Retained: green outer frame and the identified timber sash. It is not a promise that every sash can accept a replacement.
3 · Insert replacement
New: blue INNER FRAME, new sash and glazing within it. Retained: the existing green OUTER FRAME in the opening. The retained frame must be assessed; no suitability assumed.
4 · Full-frame replacement
New: complete blue outer frame, new sash and glazing assembly. Old outer frame is NOT retained. Wall rough opening shown in tan. The wall interface is a further scope; no sealing detail promised.
Read the complete diagram explanation
- Four window repair scopes
- Isometric component comparisons show a contact seal, a sealed glass unit within retained timber sash and green outer frame, a new blue insert frame nested within the old green frame, and a complete new frame within a contextual tan wall opening.
- Which part would change?
- Scope comparison
- Not repair steps.
- Green: retained outer frame
- Timber: sash
- Blue: new component
- Tan: contextual wall opening
- 1
- Weatherstrip / contact seal
- Contact seal at the joint
- Frame + sash retained
- Glass retained
- Only contact seal changes
- 2
- Sealed glass-unit scope
- Whole sealed glass unit
- Whole glazing unit changes
- 3
- Insert replacement
- New inner insert frame
- Green frame retained
- New frame fits inside
- 4
- Full-frame replacement
- New complete outer frame
- Old frame not retained
- Wall opening is context
- Conceptual scopes.
- A contact-seal job, sealed glass-unit job, insert replacement and full-frame replacement change different components. The green retained frame and blue new frame distinguish the two replacement extents. Ask which parts stay, which come out and what happens at the surrounding wall.
- Parts and work boundaries
- Retained: green outer frame, timber sash and glazing.
- Changes: the identified contact seal between sash and frame.
- This does not replace the sealed glass unit or assess the wall.
- Retained: green outer frame and the identified timber sash.
- Changes: the assembled panes, spacer and sealed-unit edge.
- It is not a promise that every sash can accept a replacement.
- Retained: the existing green OUTER FRAME in the opening.
- New: blue INNER FRAME, new sash and glazing within it.
- The retained frame must be assessed; no suitability assumed.
- Old outer frame is NOT retained. Wall rough opening shown in tan.
- New: complete blue outer frame, new sash and glazing assembly.
- The wall interface is a further scope; no sealing detail promised.
- Complete figure text
- Four different scopes, not repair steps.
- An actual assessment determines the
- appropriate option for the real assembly.
- Blue: new / replacement component
- Retained: green outer frame,
- timber sash and glazing.
- Changes: the identified contact
- seal between sash and frame.
- This does not replace the sealed
- glass unit or assess the wall.
- Retained: green outer frame
- and the identified timber sash.
- Changes: the assembled panes,
- spacer and sealed-unit edge.
- It is not a promise that every
- sash can accept a replacement.
- Retained: the existing green
- OUTER FRAME in the opening.
- New: blue INNER FRAME,
- new sash and glazing within it.
- The retained frame must be
- assessed; no suitability assumed.
- Old outer frame is NOT retained.
- Wall rough opening shown in tan.
- New: complete blue outer frame,
- new sash and glazing assembly.
- The wall interface is a further
- scope; no sealing detail promised.
- Conceptual sections, not to scale.
- No opening, removal or installation
- sequence is shown. No costs, approval,
- performance or water-entry finding.
- Source and limits
- NRCan, Keeping the Heat In, chapter 8: components/glazing (8.1.1 and 8.1.3), replacing glazing/sashes/windows (8.1.5), weatherstripping (8.1.10), and the final insert-versus-complete-tear-out paragraphs.
- Original NRCan chapter: https://natural-resources.canada.ca/energy-efficiency/home-energy-efficiency/keeping-heat-section-8-upgrading-windows-exterior-doors
- Canadian homeowner guidance, web chapter modified 14 January 2025; sources reviewed 24 October 2026.
- The actual frame, assembly condition, manufacturer instructions and proposed work determine suitability and scope. This is no DIY sequence, eligibility finding, cost, code-clearance, certification, approval, thermal rating, waterproofing promise or real-property diagnosis. The tan opening is context; flashing/drainage/air-sealing details are not specified.

An insert replacement fits new components within a retained frame. NRCan distinguishes it from a complete tear-out, which removes the existing frame as well. The condition and installation of the retained frame matter to the choice. A full replacement is a different scope of access and disturbance, rather than a universal upgrade to prescribe from a misted photograph.
Window-to-wall water entry requires an explanation of the relevant interfaces, drainage and installation. Moisture-source or ventilation work addresses a different part of the system. Ask the provider what was identified, which component the work changes and what remains outside the proposal. The repair picture compares scopes; it does not choose one for a home.
Matching manufacturer instructions and the actual assembly govern the work. Avoid a generic instruction to caulk every outside joint or unblock an unidentified opening. The window-maintenance guide owns operation and matching hardware questions; the leak and building-envelope guides cover investigations that extend beyond the glazing.
Different work changes different components
- Glazing-unit workThe identified sealed glazing assembly. It does not automatically include the frame-to-wall interface.
- Operation or weather-seal workHardware, moving contact and the matching seal arrangement. It does not establish every glass or concealed wall condition.
- Insert or full-frame replacementDifferent retained or removed parts and installation access. The actual frame condition and installation determine the appropriate scope.
- Moisture or ventilation workThe source, removal or distribution of indoor moisture. It does not repair an unaddressed rain-entry route.
Use an identified condition and matching proposal; these are not interchangeable recommendations.
Sources for this comparison
Further reading: Natural Resources Canada · Keeping The Heat In - Section 8: Upgrading windows and exterior doors; Health Canada · Guide to addressing moisture and mould indoors.
Sources for this chapter
What should I ask before accepting replacement or investigation?
Ask the provider to identify the window arrangement and the condition being addressed. For apparent moisture within a sealed unit, ask how that location was confirmed and what the proposed unit replacement includes. For a rain-linked stain, ask whether the scope examines the interface and affected materials rather than only replacing clear glass.
Request a clear boundary: which windows, surfaces and accessible areas were considered; what remains concealed; and whether further investigation is proposed. A specialist can explain a finding within that scope. A product specification or a photograph of finished trim supplies different information and should not silently stand in for the assessment.
Compare actual scopes before comparing prices. Include access, removal, restoration and follow-up where they are part of the proposed job. Check the actual product identity and written warranty arrangements with the provider. This guide supplies no national price, remaining lifespan, warranty entitlement or promise that replacement will solve an unassessed moisture source.
Sources for this chapter
What is worth recording without creating a complicated file?
A short description can be enough to start: the room and window, the apparent wet face, the time and weather, and any change in nearby materials. Include the normal covering position or a relevant activity such as bathing. Distinguish something you saw from something another person reported.
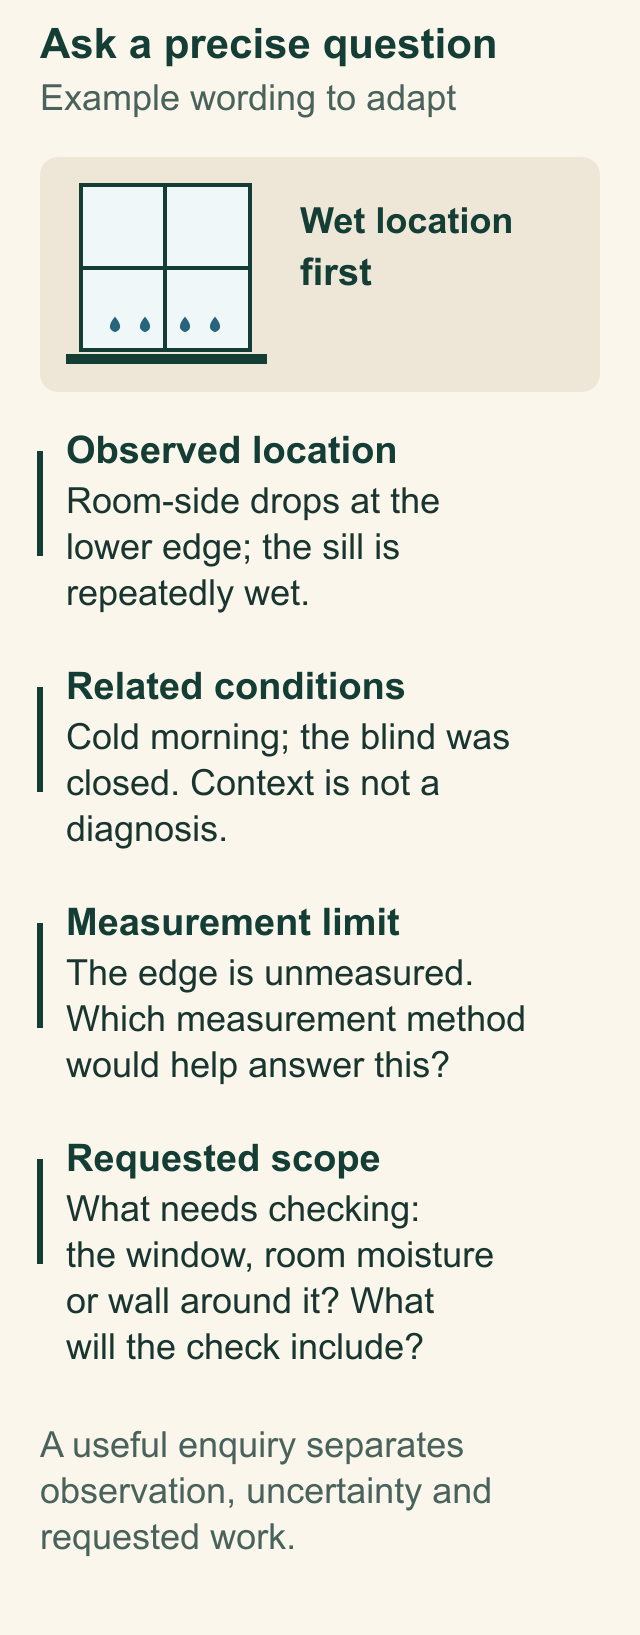
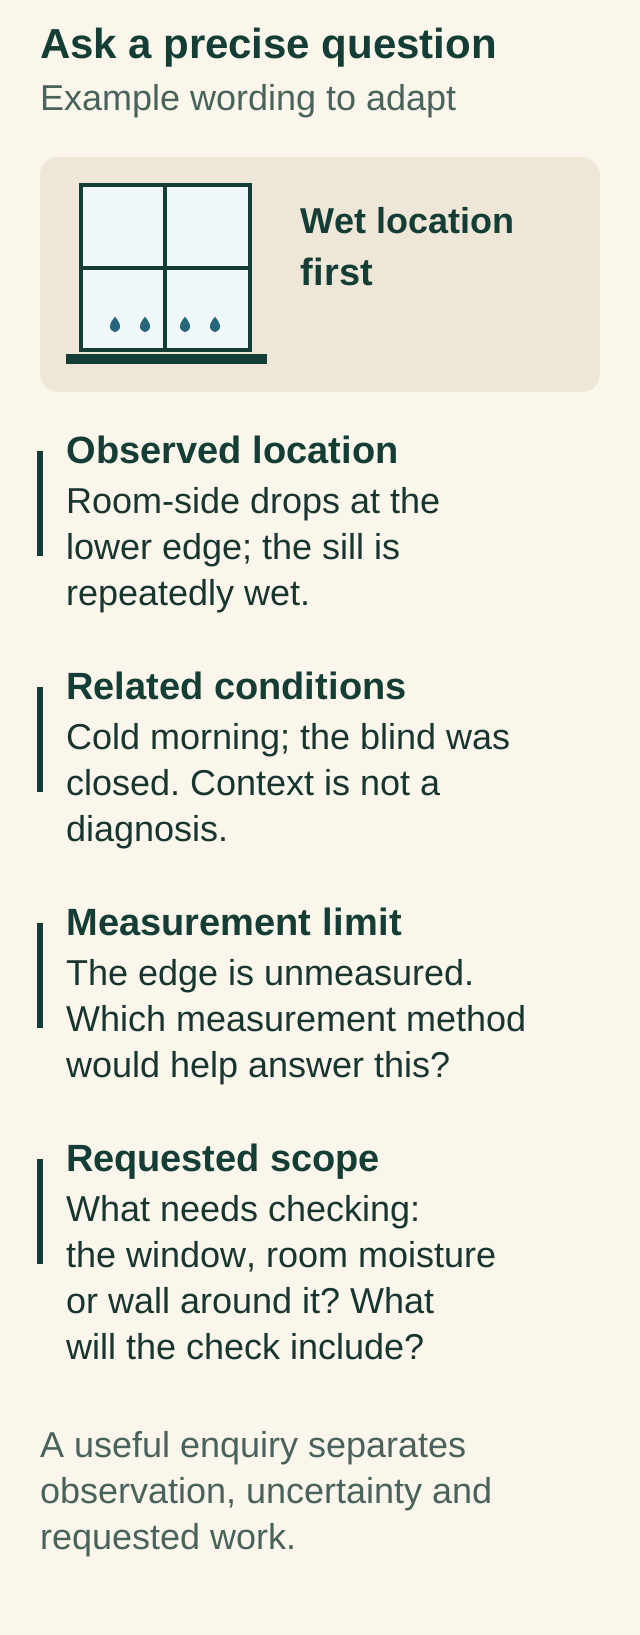
A short observation can ask a precise question
Use a short note to say where the water is, what else was happening and what you want checked. Ask which surface needs measuring, which method would help and who will explain the result.
Observed location
Example: room-side drops at a lower edge and a repeatedly wet sill.
Related conditions
Example: cold morning, ordinary closed blind; these are context, not a diagnosis.
Measurement limit
The edge is unmeasured; ask which measurement method would help answer the question.
Requested scope
What needs checking: the window, room moisture or wall around it? What will the check include?
Read the complete diagram explanation
- Turn a vague replacement request into a useful enquiry
- Example wording separates room-side drops, cold-morning context, an unmeasured edge and a question about what needs checking.
- A short observation can ask a precise question
- Use a short note to say where the water is, what else was happening and what you want checked. Ask which surface needs measuring, which method would help and who will explain the result.
- Observed location
- Example: room-side drops at a lower edge and a repeatedly wet sill.
- Related conditions
- Example: cold morning, ordinary closed blind; these are context, not a diagnosis.
- Measurement limit
- The edge is unmeasured; ask which measurement method would help answer the question.
- Requested scope
- What needs checking: the window, room moisture or wall around it? What will the check include?
- Complete figure text
- Ask a precise question
- Example wording to adapt
- Wet location
- first
- Room-side drops at the
- lower edge; the sill is
- repeatedly wet.
- Cold morning; the blind was
- closed. Context is not a
- diagnosis.
- The edge is unmeasured.
- Which measurement method
- would help answer this?
- What needs checking:
- the window, room moisture
- or wall around it? What
- will the check include?
- A useful enquiry separates
- observation, uncertainty and
- requested work.
- Sources and limits
- Health Canada · Guide to addressing moisture and mould indoors
- https://www.canada.ca/en/health-canada/services/publications/healthy-living/addressing-moisture-mould-your-home.html
- Health Canada, Guide to addressing moisture and mould indoors, January 2023; sources reviewed 24 October 2026.
- Fluke ·59MAX/59MAX+ Infrared Thermometer Users Manual,PN4311999
- https://assets.fluke.com/manuals/59max___umeng0000.pdf
- Fluke 59 MAX / 59 MAX+ Users Manual, PN4311999, March 2013. This is a named instrument example; the current revision has not been established.
- Instrument scope: reflective-target warnings, emissivity, and the distinction between display resolution and accuracy.
- This example supplies no universal glass setting, generic accuracy allowance, laser procedure or device recommendation. Follow the applicable equipment instructions.
- Natural Resources Canada · Keeping The Heat In - Section 8: Upgrading windows and exterior doors
- https://natural-resources.canada.ca/energy-efficiency/home-energy-efficiency/keeping-heat-section-8-upgrading-windows-exterior-doors
- Canadian homeowner guidance, current web chapter modified 14 January 2025; sources reviewed 24 October 2026.
- Window components and work scopes only, without installation, code or product approval.
- This note is example wording to adapt. Keep actual observations and assumptions separate; it is not an assessment result or a universal humidity target.
If readings are available, keep their locations, time, units and instrument identity beside them. Label assumptions as assumptions. An unmeasured wet edge should remain unmeasured in the record; do not fill it with a centre reading simply to complete a calculator. The purpose is to help the next person understand the actual question.
Add the requested scope and later response in plain language. Glazing identity, outdoor exhaust performance and a damp-wall investigation are different enquiries. Retain the provider’s actual findings and limits when available. An appointment booked, a unit ordered and work completed are separate stages; describe the stage that has actually happened.
Sources for this chapter
How will I know whether the next step answered the question?
Return to the part and mechanism that prompted the work. Was an identified glazing unit replaced, an operation issue serviced, a water-entry interface corrected or a moisture source addressed? Keep the explanation of what changed with the actual completion information, including remaining recommendations.
Observe later ordinary conditions without pretending that weather and use stayed identical. One dry morning after work does not reproduce every previous cold or rainy event. If wetting recurs, the original location and the stated work scope help the provider decide what remains unanswered.
Canadian climates, exposures and window arrangements vary. This guide explains the relationship between surfaces, moisture and repair questions using national homeowner guidance and a bounded instrument example. It does not certify an installation or provide a universal RH setting. The useful result is a clearer cause-and-scope discussion before the home is asked to prove more than the observations support.
Sources for this chapter
Keep learning about the connected parts
- A sticking window: understand the parts before replacement
- HRVs and ERVs explained: fresh air, heat recovery and useful maintenance
- Water leaks explained: find the right question before the repair
Canadian context and authorities · Visual atlas · Learning labs
Condensation lab
Change room conditions. Watch the temperature margin change.
Surface margin = surface temperature − dew point
NOAA vapour-pressure formulation. Approximate scenario; reflective surfaces and instrument uncertainty matter.
Know what the words mean.
- Surface margin
- The entered surface temperature minus the calculated dew point. It helps compare a particular surface with conditions that can support condensation.
- Input uncertainty
- How much confidence you can place in the observations entered, including the device, location, timing and measurement method.
- Glazing
- The transparent material, usually glass, in a window or door.
- Sash
- The part surrounding the glazing; an operable sash moves within the window arrangement.
- Frame
- The surrounding window component that supports a sash or fixed glazed area.
- Insulating glass unit
- An assembly of panes with sealed spaces between them, distinct from a separate storm window.
- Spacer
- The component separating glazing panes at their edge; its heat-transfer properties affect the edge relationship.
- Weatherstripping
- Material at an operating joint that helps seal the contact between moving and fixed parts.
- Room-side condensation
- Water formed on the window surface exposed to indoor air.
- Exterior condensation
- Water formed on the outdoor surface of a window under the relevant outdoor conditions.
- Storm window
- An additional window assembly installed inside or outside another window, rather than another pane in its sealed unit.
- Relative humidity
- Actual water-vapour pressure expressed as a percentage of saturation vapour pressure at the same temperature.
- Dew point
- The saturation temperature calculated for the air conditions being described.
- Surface temperature
- The temperature of the particular glass, frame or other surface being considered.
- Air circulation
- Air movement within the room or nearby window space, distinct from leakage through the enclosure.
- Air leakage
- Air passing through an opening or discontinuity under a pressure difference.
- Emissivity
- A surface property affecting emitted infrared energy and the interpretation of an infrared temperature measurement.
- Building envelope
- The connected parts separating the indoor environment from outdoors, including walls, roof, windows and doors.
- Insert replacement
- Replacement components installed within an existing retained frame under a suitable identified arrangement.
- Full-frame replacement
- A replacement scope that removes the existing window frame as well as the window components within it.
Questions to bring
to the conversation.
- Where exactly is the moisture, and which window arrangement is present?
- Which room, weather and covering conditions accompanied it?
- Do the air and surface readings describe matching locations and times?
- Which component or moisture source does the proposed work change?
- What remains concealed, unmeasured or outside the provider’s scope?
Separate a showing observation, an existing record and a new professional assessment. Unknown means a question remains; it does not automatically mean a defect.
Use the evidence planner ↗Go to the source.
Original HomeAI explanation informed by these public references. Sources support the underlying guidance; they have not reviewed or endorsed HomeAI. Diagrams are conceptual, and calculator outputs depend on your inputs.
References read for this guide on October 24, 2026. The NOAA formulation supports the entered calculator scenario. The named Fluke manual is an instrument example, not a universal glass-measurement setting or a window-assessment standard.
Canadian national homeowner guidance explains mechanisms and scope. The Fluke manual is a retained March2013 instrument example; no universal glass setting, owner repair method or current model endorsement is supplied. Actual product instructions and the identified home remain relevant.
Publication & source review
First published .
Sources reviewed .
- Natural Resources Canada · Keeping The Heat In - Section 8: Upgrading windows and exterior doors
- Natural Resources Canada · Condensation
- Natural Resources Canada · Keeping The Heat In - Section 2: How your house works
- Health Canada · Guide to addressing moisture and mould indoors
- NOAA / National Weather Service · Wet-bulb and dewpoint temperature from air temperature and relative humidity
- NOAA / National Weather Service · Vapor Pressure
- Fluke ·59MAX/59MAX+ Infrared Thermometer Users Manual,PN4311999
Have a question about your home?
Start with the symptom, timing and what you have observed.
Ask HomeAI